Showing posts with label my own creations. Show all posts

Tuesday, 14 February 2012

Vampire's Day Soiree- Part 2: Valentine Vampire Cake

In honour of today being February 14th, HSL is taking part in the Vampire's Day Soiree, being run by Holly at Holly's Horrorland! So, instead of cheesy, sickly sweet, love-themed posts, you'll be getting some amazing, blood-drenched, vampire posts. Okay, so the posts here will probably be just as cheesy, but I'm sure some of the other participants will be able to give you something a little more sophisticated and refined ;) You'll find a list of the other participants and links to their blogs at the end of each Vampire's Day post here. That done with, on with part 2 of the sanguinary fun!

Part 2: Vampire-themed Cake 


How to make this bloody cake!

You will need:


- 1 large rectangular sponge cake
- 2 small rectangular sponge cakes (I made mine, but you can always buy them if you want to)
- Fondant icing or marzipan
- Red and black food colouring
- Chocolate hearts
- Designer icing in red, or chocolate icing
- Sugar skull and spiderweb decorations
- Pastry brush / paintbrush


Cover the large cake with fondant icing to form the base


Using the red food colouring, paint the entire base with the pastry brush. Then apply streaks of black to create the effect above. The colouring will make the cake shiny while wet, but it is more matt when completely dry.


Cut the two smaller cakes into coffin-shaped cakes and stick them next to each other onto the base using the chocolate icing. Paint the top with more red colouring.


Using the fondant icing, make the shapes for the vampire, coffin edging, and lips. Paint them as desired and add some chocolate hearts in the empty side of the coffin. Don't worry if your vampire looks like a cross between a penguin and Ernest the Vampire. Mine did too! :D 


Add some fondant teeth and bloody fangs to the mouth and then add the chocolate icing heart, topped with white chocolate decorations and sugar skulls / spiderweb decorations wherever you want them. 


And you're done! 

I don't have a photo of it after it dried, but I think the gross, oozy, shiny blood look kind of works with this theme ;)


Other  Vampire's Day Soiree Participants:

Tuesday, 2 August 2011

Food and Drink & How-to Guides: Skull Eyes Cake

Skull Eyes Cake by Lilia Tombs
If you ever find yourself having a zombie tea party, but don't know what kind of cake to serve, this Skull Eyes Cake might just be what you need. It would probably go down quite well with humans at Halloween or a spooky birthday party too!

Skull Eyes Cake by Lilia Tombs


Recipe and how-to guide after the cut below↓

Saturday, 30 July 2011

Fashion & How-to Guides: Spooky Nail Art


My friend and I were bored last week, so I decided to do some spooky nail art. It was fun and so I thought I'd make it into a how-to guide, just in case you too find yourself with nothing better to do! 


Guide & close-ups of each nail are after the cut below↓

Wednesday, 6 April 2011

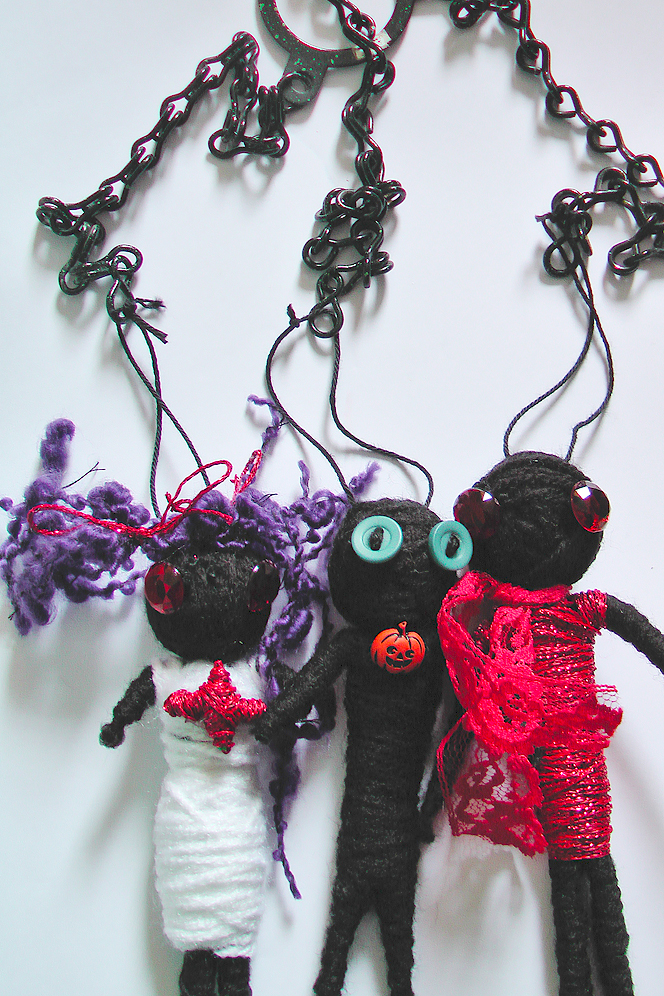
Toys, Dolls & How-To Guides: Creepy Little Yarn Dolls

My yarn dolls
Kei of Unfortunately Oh! recently sent me a link to a tutorial, from Dollar Store Crafts, on how to make yarn "voodoo dolls". Since I collect voodoo dolls & toys related to them, I thought it would be great fun to try making some of my own voodoo doll toys and to share a how-to guide here on HSL! Mine came out looking rather different to the DSC one, but that's the great thing about these - they're so customisable! I also chose to make a decoration from mine, using an old light fitting that I had, but you could adapt them to go on necklaces, keychains, or anything else that takes your fancy too.

You will need:

  • Yarn or string (colour of your choice)
  • Needle and thread (same colour as yarn)
  • Thin, bendable wire (colour does not matter as it will be covered)
  • Sponge, cotton wool balls or foam (for the head)
  • Scissors
  • Glue (either hot glue or PVA glue, not super glue, as some super glue contains chemicals that melt yarn fibres. Although it fuses it together really well, it smokes and, if you use too much, it can cause a hole)
  • Buttons & decorations
  • Something to attach your doll(s) to *Optional*
Tutorial after the cut below↓:

Tuesday, 29 March 2011

How-To Guides: Pumpkin Parcels


Today brings another find from an article in a magazine that was kindly given to me. It was in the October 2010 issue of Your Home, which had a section about Halloween crafts. None of them are on the website, so I thought I'd make them and share the guides here.

First up - Pumpkin Parcels! I used orange tissue paper instead of crepe paper and green tissue paper & cellotape instead of green florists tape, but they are essentially the same.


They're really easy to do and, depending on how many you make, only take between 5 minutes and half an hour to produce. You could put little presents or sweets or anything else you want inside and draw jack o' lantern faces on them to make them more individual, so they're also pretty versatile.

My pumkin parcels


You will need:
  • Cellotape / double-sided tape
  • Scissors
  • Green tissue paper (or green florists tape)
  • Orange tissue or crepe paper
  • A pen
  • Something to fill the parcel with
  • A dinner plate (to draw around, not pictured)
More pictures and a step by step how-to guide after the cut below↓

Friday, 11 February 2011

Food and Drink: Mr. & Mrs. Bones Cakes Tutorial

Firstly, I should point out that Valentine's Day is not really something I care about one way or the other. I don't think I've ever celebrated it, but I don't hate it either. It's just kind of....there. However, if you're going to mark the occasion, why not do so in horror-themed style? Or at least give the object of your affection matching skeleton cakes!

Mrs. & Mr. Bones cakes
If you can't or have no wish to bake cakes, then don't worry, this entry is all about how to decorate store-bought slices! You can either decorate one of each, or two of the same depending on your relationship and, you can even customise the accessories to make them more personal to your darling devil. to top it off, they're really simple too!

How-to guide after the cut below↓

Tuesday, 25 January 2011

Music & How-To Guides : Custom Doll Head Theremins

Some time ago I came across these fantastic doll head theremins by XLPC and got 2, which I subsequently named Samedi and Dead Boy. I also painted them and added some little details, using epoxy putty, so that they looked more to my taste. When it arrives, each theremin comes looking something like the photos below (though the face shapes and expressions vary) and has red LED lights in its eyes, which you can turn on and off via the red button.
Photo from XLPC Theremin, LEDs off
My two theremins, unpainted, in the dark with LEDs on
The theremin's extra large photo cell reacts to any type of light - light bulb, natural light, flashlight, laserpointer, TV etc. - and then you can control the volume and pitch by moving your hands over the cell. You will need to use it with an amplifier though and distortion units are recommended to get the most interesting sound out of the instruments. There are also no jack leads included, so you'll need to get one yourself. However, the uniqueness of XLPC's products far outweighs those minor details and I highly recommend them!


After customising them, using epoxy putty and model paint, this is what mine looked like:

Samedi and Dead Boy
   Theremin Specs
The XLPC Theremin:
  • 8 ohm speaker (very small, low volume, hence the need for an amp)
  • Red On/Off Switch (for the LEDs)
  • Silver pitch/volume knob 
  • Extra large photo cell 
  • 1/4" Output jack (amp. cable not included)
  • 1 C Battery
  • Doll head and heavy duty plastic case

Customisation

 1. After lightly going over each theremin with fine sandpaper and making sure the surface was free of dust, I then added lips and fang details to Dead Boy, using epoxy modelling putty (from Games Workshop)


 2. I left the putty to dry completely and become hard (I used Green Stuff rather than polymer clay as it air sets and I didn't want to put the theremin in the oven!) and painted Dead Boy. I used model paint from Games Workshop, since there's a store in my town and their paint goes on very smoothly and evenly, but any good-quality acrylic paint will do and it can be found at most craft/art supply stores.


3. I painted Samedi. When painting, be really careful not to get paint on the photo cell on top of the head as it needs light and won't function correctly if covered

4. Using matte, clear varnish (also from Games Workshop), I then covered the whole of both heads (excluding the photo cells) with two coats, leaving them to dry between the first and second


Obviously you can customise the theremins however you like. I chose to make Dead Boy a vampire baby and Samedi has symbols, which are loosely based on his namesake Baron Samedi's veves, on his face.

Thursday, 14 October 2010

Food and Drink: Halloween Gingerbread House

A few days ago I told you about Dylan's Candy Bar's gingerbread playhouse and Dr. Oetker's Bat Cookie Kit. Well, much to my surprise yesterday, Dr. Oetker yet again provided a fun, sweet treat! The Christmas Halloween Gingerbread House Kit! Admittedly, it is supposed to be Christmas themed, but with a few adjustments it can easily have a Halloween or horror theme and it's nowhere near the price (or size) of the Dylan's Candy Bar version. 

The kit includes:
  • Gingerbread shapes (for main house)
  • Jelly diamonds
  • Mini marshmallows
  • Chocolate beans
  • Designer icing (white)
You'll need a knife to cut out the door too, and I chose to customise mine with Halloween candy, toys and black icing as well.


↑The Halloween gingerbread house that I made↑


Extras (not included in kit):
  • Black icing (from Bat Cookie Kit)
  • Finger pupper monsters
  • Ghost & witch chocolates
  • Skulls & Bones candy
  • Rainbow drops
Everything but the black icing was from Handy Candy.


More pictures and instructions on how to make the Halloween house after the jump below! (Just like the bat cookies, it's really simple!)

Friday, 8 October 2010

Food and Drink: Bat Cookies

I decided to try using a cookie mix instead of baking from scratch as I usually do and came across this! Dr. Oetker's 'Halloween Bat Cookie Kit' will make a spooky addition to any seasonal party food this year, or just a creepy and cute treat for any occasion! They're really simple to make, since all you have to do is combine the ready-prepared dry ingredients with some butter/spread, cut out the bat shapes (cutter included) and cook for 10 minutes! Simple!

They came out really well and I don't think anyone, no matter how young, would have any difficulties making these. So they're definitely a good choice for those of you with little monsters or just those of you with less time/baking experience.

If you want to add anything like chocolate chips, nuts or fruit, you will need to add a little more butter/spread and flour to ensure that you have enough dough to go over the extras. It may be better just to add those on top of each cookie instead though.


The kit includes:
  • Cookie mix
  • Bat cookie cutter
  • Black writing icing
Makes 6 cookies
(I managed to make 7 and probably could have done 8)


In addition to these kookie cookies, Dr. Oetker also make a Halloween Cupcake Kit and Halloween Apple Decorating Kit as well! I want to try them out some time.

More pictures and a cookie recipe (for anyone who can't find the kit but still wants to make Halloween cookies) after the jump↓

Thursday, 26 August 2010

Food and Drink: Spooky Cakes & Horror Muffins


Today I thought instead of just showing you other people's spooky creations, I'd share some of my own! The above photo is a chocolate coffin-shaped cake, which features a marzipan skeleton. The whole thing was great fun to make; especially the figure! If you'd like the recipes for anything in this entry, let me know.

More of my creepy confectionary after the jump.

Related Posts Plugin for WordPress, Blogger...