
 |
| Skull Eyes Cake by Lilia Tombs |
If you ever find yourself having a zombie tea party, but don't know what kind of cake to serve, this Skull Eyes Cake might just be what you need. It would probably go down quite well with humans at Halloween or a spooky birthday party too!
 |
| Skull Eyes Cake by Lilia Tombs |
Ingredients:

230g Demerara Sugar
250g Wholemeal Self-Raising Flour
200g Cocoa Powder
50g Dark Chocolate
3 Eggs (or the equivelent of egg substitute)
200ml Milk (or soy milk)
200ml Water
2 Tablespoons Agave Nectar
2 Teaspoons Vanilla Essence
Pecans

Light Double Cream (or vegan cream)
200g Cocoa Powder
100g Icing Sugar

White Ready Roll Icing (or marzipan) x2
Red Silver Spoon Designer Icing (blue is pictured)
Black Silver Spoon Designer Icing (blue is pictured)
Red, Blue and Black Food Colouring
Method for the Cake

1. Sieve the flour, sugar and cocoa powder together. Add the rest of the dry ingredients (except for the dark chocolate) and stir.

2. Add the eggs, vanilla essence, agave nectar and milk to the dry ingredients. Mix together. Add the water gradually to the mixture until you have the desired consistency.
3. Break or chop up the dark chocolate into small chunks and add to the rest of the ingredients. Mix briefly and pour into two pre-lined cake tins. Cook for 30 minutes.

4. When the cakes are done, they should spring back up when pressed. (Don't worry if they're a little messy; they can be trimmed and will be covered).

5. Leave the cakes on a cooling rack whilst you make the filling. Put the filling ingredients in a bowl and mix briefly together. Then whisk them together, either with an electric or hand whisk, until in soft peaks.


6. Once the cakes are cool, put some of the filling on one of them and then sandwich the other on top of it. Then cover the sandwiched layers in a thin layer of the filling. This will help to attach the royal icing onto the cake base.

7. Take the two packets of royal icing and knead them together until easily malleable. Take half of the icing and roll it out. Then place it over the cake. If you need to tidy the edges up, roll out a piece of icing (approximately the depth of the cake) and wrap it around the edge.


8. Take a piece of the remaining royal icing and roll it into a thin sausage shape. Then place this around the top circumference of the cake. Following this, draw small stripes, in red and black "designer icing", over this circumference piece. Then place another sausage shape around the edge of the now striped first sausage.

9. Using the black food colouring and a clean paintbrush, paint the skulls on the inside of the stripy ring.

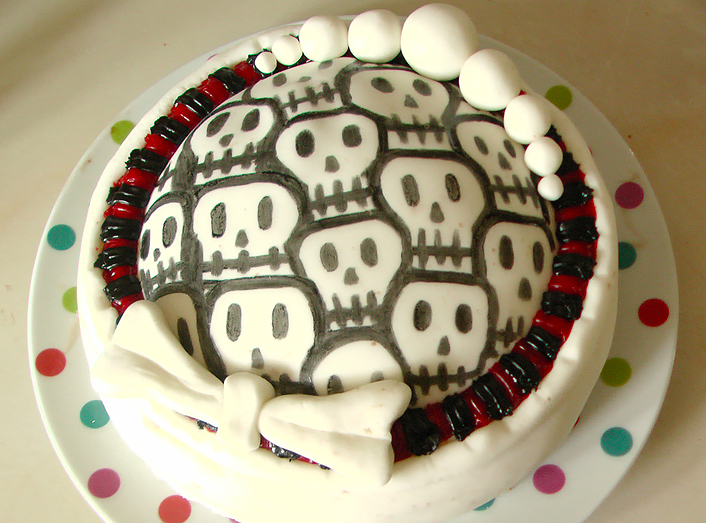
10. Using the royal icing again, roll 8 pairs of spheres (2 of each size) and 1 large ball for the eyeballs. Then sculpt the bow and skull shapes. Place them on the top of the cake unpainted. (Painting the bow before you put it on the cake might be a better idea as the food colouring can be messy).
11. Paint the remaining details and use the last pieces of icing to make 4 skulls for the edge of the cake and you're done!

That cake looks SO awesome! I wouldn't have thought the decoration would be as simple as it is, so thank you so much for posting an explanation! :D
ReplyDelete@Kei
ReplyDeleteThanks :) I even think I made it seem more complicated than it actually was though! lol