As I mentioned in a previous post, they have chocolate bats at Sainsbury's this year. So when I also got this bat cupcake decorating set (above) from Asda, I decided to combine the two and make some spooky cupcakes (below)!
They're really simple, so I didn't do a proper tutorial about them. Just use whichever cupcake recipe you prefer and, once cooked, then leave them to cool.
Following that, ice them all, put a bat-topped cocktail stick in and spider chocolate on each one and you're done! :)
More Halloween decor, this time in the shape of this wonderful light-up ghost globe! The "snow" inside it consists of black bats and orange glitter, which compliments the colours in the spiderweb pattern on the base. Madame Luciel bought it for me last year and the light still works. Hurray!
Lit up, with the lights off in the room
The ghost, which acts as the light, illuminates the globe and approximately 1cm around it but not much more. The base isn't lit, but I think it would be distracting from the main focal point (aka the ghost) if it was.
This ghost globe really is more of a decoration than a light, but it's better that way, as you can look directly at it without being blinded!
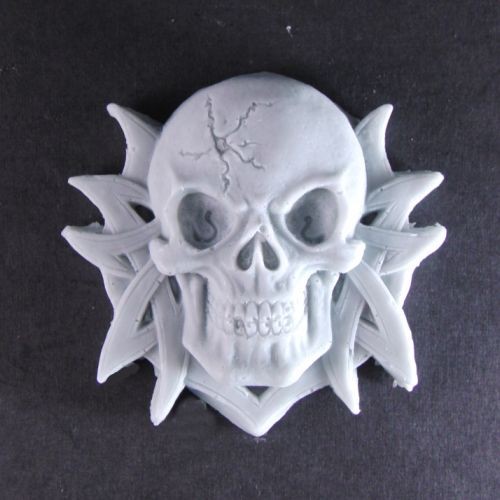
Last month, for a friend's birthday, I decided to take the opportunity to use a new skull-shaped pan I had and make him a spooky cake! Since I know some of you like to bake, I thought I'd share the incredibly simple decoration details with you here. It's just a vanilla sponge cake (I made other bits of the cake too, but they weren't horror-esque), so I haven't included a recipe below, only decoration instructions.
It's a dark and stormy night; a thick fog rolls in, distorting everything in sight, including your own reflection in the steam-covered mirror in front of you. Everything is silent and still, except for the low gush of flowing water. Suddenly, through the eerie mist, you see zombies, bats, spiders, skulls, brains, and all sorts of horrors in front of you! A shiver of terror creeps down your spine, but, being the knowledgeable spook slayer you are, you know just what to do...dissolve them in your bathwater! For these are no ordinary ghouls, dear devils - oh no! These are the fantastically frightening soaps from The Soapy Shop of Horrors, where "horror isn't just for Halloween...it's for bathtime too!"
Each of these creepy cleaners are designed and handmade in the UK, by Soapy Shop of Horrors founder Suze Laing. She started the shop after "buying some “Halloween” soap for friends in the U.S.A" and, after finding that the UK selection was somewhat limited, she began to make her own. Following this creative soap crafting, Suze had a breakthrough moment, and realised that "maybe, just maybe, others would want some oddly shaped soaps too, and not just at Halloween!". She was right!
As well as the products being gory and gorgeous, they're amazingly detailed, and most look like little sculptures rather than soap! This level of detail, together with with the ability of the buyer to choose the colour and scent combination desired, for most of the items on sale, and really affordable prices, make The Soapy Shop of Horrors a very unique and delightfully strange find. Moreover, the little facts about the featured soap horror character, at the bottom of each page, are a great bonus, and make the website interesting and endearing too!
This delightful spooky chocolate mold was bought as a present for me from the "home and creative kitchenware" shop Lakeland. I assume it was produced for Halloween and so I'm not sure if they still make it or not, but there are many other places, such as FRED, that sell themed chocolate/ice cube molds that could be used instead.
It's made of ridgid but bendable rubber, which means that although it will keep the shape of the chocolate well, it's also very easy to pop out each one when you're done. The rubber material also helps to ensure that they don't stick to the mold. There are shaped ridges and raised areas in each section, meaning that it is really simple to add cute details just by filling them in with a different colour chocolate. I used a small paintbrush to do the details in dark chocolate and then, after leaving it to set for a few minutes, poured in the white chocolate to fill up the rest of the mold.
Make sure the chocolate is completely melted and smooth before you start, as this will give a better outcome. The finished products below might look a little messy, but that was because I used a paint brush that was a little too large for the gaps, not because of the mold itself.
I decided to try using a cookie mix instead of baking from scratch as I usually do and came across this! Dr. Oetker's 'Halloween Bat Cookie Kit' will make a spooky addition to any seasonal party food this year, or just a creepy and cute treat for any occasion! They're really simple to make, since all you have to do is combine the ready-prepared dry ingredients with some butter/spread, cut out the bat shapes (cutter included) and cook for 10 minutes! Simple!
They came out really well and I don't think anyone, no matter how young, would have any difficulties making these. So they're definitely a good choice for those of you with little monsters or just those of you with less time/baking experience.
If you want to add anything like chocolate chips, nuts or fruit, you will need to add a little more butter/spread and flour to ensure that you have enough dough to go over the extras. It may be better just to add those on top of each cookie instead though.
The kit includes:
Cookie mix
Bat cookie cutter
Black writing icing
Makes 6 cookies
(I managed to make 7 and probably could have done 8)
This charming crocheted table adornment (left) and devilish Dead Fairy decoration (right) would be ideal for everyday use, or even Halloween parties. The doilie first appeared on Lipstick and Laundry and the decoration is by user Varifiresis on on the Craftster.org forum. Dollar Store Crafts also gave tips on how to make them, both, although the Dead Fairy guide on Craftster is very thorough. Whilst you're on the Dollar Store Crafts site, you might also want to check out the guide on how to make a styrofoam spider and post on spooky Halloween decor.
Thanks to Kei for sending the Dollar Store Crafts link to me!