Showing posts with label baking. Show all posts

Monday, 29 October 2012

29th: Food: Spider & Bat Cupcakes


As I mentioned in a previous post, they have chocolate bats at Sainsbury's this year. So when I also got this bat cupcake decorating set (above) from Asda, I decided to combine the two and make some spooky cupcakes (below)!


They're really simple, so I didn't do a proper tutorial about them. Just use whichever cupcake recipe you prefer and, once cooked, then leave them to cool.


Following that, ice them all, put a bat-topped cocktail stick in and spider chocolate on each one and you're done! :)


This post is part of The Countdown to Halloween

Friday, 22 June 2012

Fright-Day Foods: Purple Glitter Skull Cake


Last month, for a friend's birthday, I decided to take the opportunity to use a new skull-shaped pan I had and make him a spooky cake! Since I know some of you like to bake, I thought I'd share the incredibly simple decoration details with you here. It's just a vanilla sponge cake (I made other bits of the cake too, but they weren't horror-esque), so I haven't included a recipe below, only decoration instructions.

This post is part of Fright-day Foods!


How-to guide after the cut below↓

Monday, 16 April 2012

A-Z Challenge: N is for...Nomskulls

N is for...Nomskulls

Nomskulls, made by Fred, are "kooky creepy" skull-shaped silicone cupcake molds and just happen to be the focus of today's A-Z post! My sister gave me a set of these last September, but I only got around to using them last night. According to the box you can:

"Knock 'em dead with these four stylish silicone skulls. Nomskulls are ready to fill with your favorite grey batter and bake into perfect cupcake craniums. One bite and you'll be head over heels, because there's no doubt about it - this skull bone's connected to the YUM bone!"


For some reason known only to my brain, I forgot that I was making skull-cakes and decided to make the mixture red. The molds are fairly huge but don't make too much batter, as they will overflow if you don't leave the top inch or so free. Of course, it depends entirely on what kind of mix you make and how much you expect it to rise though. 

So that's 3 brain-spills and 1 fancy hairstyle at the back...

However, despite the overflow setbacks, the good thing about the molds being silicone is that any spills come off really easily and the contained cupcake slides out equally as well when you're done.


Unfortunately, the inside of the mold is completely smooth (see photo above) except for the eye imprints, which means that the cakes will come out looking like zombies and aliens unless you decorate them. 


I'm fairly sure that they were intended to be served only inside the molds rather than out of them. It doesn't matter that much though, as the flat tops are there to be adorned with iced brains! 


If you do decide to take them out of the mold, you could try sugar skull-themed icing, zombies with eyeballs popping out, gas maks, Frankenstein's Monster...the list goes on. I think I'll experiment a little and make another post about the decoration when A-Z is over. (It might seem like I've caught up here, but the truth is I'm still missing J, K, L, and M.)

To be continued....in May

This post is part of the A-Z Blogging Challenge.


Friday, 12 August 2011

Fright-day Foods: Infected Cupakes


Another post for Fright-day Foods!

Many horror-themed cakes are made in the creepy cute style, largely because it looks much more appealing to eat than say, green slime and guts. However, if you want to have horror-themed eats that truly reflect the nature of the subject matter, then try these thoroughly disgusting looking (but delicious tasting) 'Infected Cupcakes'! The green cake represents the infected flesh, whilst the red fruit and white cream denote the oozing blood and pus respectively. Mmm...yummy! :D

To make these cupcakes: 

  • I used an amalgamation of a meringue (ignore the clotted cream, just make the meringue) and a cupcake recipe, and added a dash of green food colouring to the mix (you don't need much). I also added some cream of tartar to make the mixture thicker, but it isn't really necessary. Cook them as you would cook the cupcakes, as they are more like cakes than meringues. The meringue part gave it a fruity tang, whilst the cupcake part gave a cake-like texture. 

  • For the filling, I whisked up some low-fat double cream and put some icing sugar into the a portion of the 'Blood Shake' mixture and put it in the fridge overnight. This then gave it the consistency of a thin jam/thick sauce. I then took off the cupcake lids (muffin tops) and placed them upside down. Then the cream and 'Blood Shake' sauce went on, followed by the bottom of the cupcakes.

Tuesday, 2 August 2011

Food and Drink & How-to Guides: Skull Eyes Cake

Skull Eyes Cake by Lilia Tombs
If you ever find yourself having a zombie tea party, but don't know what kind of cake to serve, this Skull Eyes Cake might just be what you need. It would probably go down quite well with humans at Halloween or a spooky birthday party too!

Skull Eyes Cake by Lilia Tombs


Recipe and how-to guide after the cut below↓

Friday, 11 February 2011

Food and Drink: Mr. & Mrs. Bones Cakes Tutorial

Firstly, I should point out that Valentine's Day is not really something I care about one way or the other. I don't think I've ever celebrated it, but I don't hate it either. It's just kind of....there. However, if you're going to mark the occasion, why not do so in horror-themed style? Or at least give the object of your affection matching skeleton cakes!

Mrs. & Mr. Bones cakes
If you can't or have no wish to bake cakes, then don't worry, this entry is all about how to decorate store-bought slices! You can either decorate one of each, or two of the same depending on your relationship and, you can even customise the accessories to make them more personal to your darling devil. to top it off, they're really simple too!

How-to guide after the cut below↓

Friday, 8 October 2010

Food and Drink: Bat Cookies

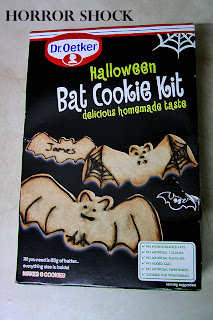
I decided to try using a cookie mix instead of baking from scratch as I usually do and came across this! Dr. Oetker's 'Halloween Bat Cookie Kit' will make a spooky addition to any seasonal party food this year, or just a creepy and cute treat for any occasion! They're really simple to make, since all you have to do is combine the ready-prepared dry ingredients with some butter/spread, cut out the bat shapes (cutter included) and cook for 10 minutes! Simple!

They came out really well and I don't think anyone, no matter how young, would have any difficulties making these. So they're definitely a good choice for those of you with little monsters or just those of you with less time/baking experience.

If you want to add anything like chocolate chips, nuts or fruit, you will need to add a little more butter/spread and flour to ensure that you have enough dough to go over the extras. It may be better just to add those on top of each cookie instead though.


The kit includes:
  • Cookie mix
  • Bat cookie cutter
  • Black writing icing
Makes 6 cookies
(I managed to make 7 and probably could have done 8)


In addition to these kookie cookies, Dr. Oetker also make a Halloween Cupcake Kit and Halloween Apple Decorating Kit as well! I want to try them out some time.

More pictures and a cookie recipe (for anyone who can't find the kit but still wants to make Halloween cookies) after the jump↓
Related Posts Plugin for WordPress, Blogger...